Are you looking to build a remote IoT VPC network using Raspberry Pi and free AWS resources? You’re in the right place! This guide will walk you through everything you need to know about setting up a secure, scalable, and cost-effective IoT network. Whether you’re a beginner or an experienced developer, this article will provide you with actionable insights and step-by-step instructions to get started. Remote IoT VPC networks are becoming increasingly popular due to their ability to connect devices securely over the internet, and AWS offers a free tier that makes this solution accessible to everyone.
With the rise of IoT devices, managing and securing them has become a critical challenge. Using AWS, you can create a Virtual Private Cloud (VPC) that acts as a secure environment for your IoT devices. Raspberry Pi, a versatile and affordable single-board computer, serves as an excellent gateway device for IoT projects. By combining Raspberry Pi with AWS’s free tier, you can create a robust remote IoT VPC network without breaking the bank. This article will explore the tools, techniques, and best practices to help you achieve this.
Before diving into the technical details, it’s essential to understand the importance of security, scalability, and cost-efficiency in IoT projects. AWS provides a range of services that cater to these needs, and Raspberry Pi offers the flexibility to integrate with various sensors and devices. By the end of this guide, you’ll have a clear understanding of how to set up and manage your IoT network, ensuring it meets your requirements while staying within budget.
Read also:Exploring The Fascinating World Of Elena Moussa Her Height And More
Table of Contents
- Introduction to IoT VPC Networks
- Why Use Raspberry Pi for IoT Projects?
- Getting Started with AWS Free Tier
- Setting Up a VPC on AWS
- Connecting Raspberry Pi to AWS
- Configuring IoT Core for Remote Access
- Securing Your IoT Network
- Scaling Your IoT VPC Network
- Troubleshooting Common Issues
- Conclusion and Next Steps
Introduction to IoT VPC Networks
IoT VPC networks are a cornerstone of modern IoT infrastructure. A Virtual Private Cloud (VPC) is a logically isolated section of the AWS cloud where you can launch resources in a virtual network. This isolation ensures that your IoT devices and data remain secure while providing the flexibility to connect to the internet or other networks as needed.
One of the key advantages of using a VPC for IoT is the ability to define custom network configurations. For example, you can create subnets, assign IP address ranges, and configure route tables to control traffic flow. This level of customization is crucial for IoT projects, where devices often need to communicate with each other and external services securely.
By leveraging AWS’s free tier, you can experiment with VPC configurations without incurring costs. This makes it an ideal choice for hobbyists, students, and small businesses looking to explore IoT solutions. In the following sections, we’ll delve deeper into how to set up and manage a VPC for your IoT network.
Why Use Raspberry Pi for IoT Projects?
Raspberry Pi is a versatile and affordable single-board computer that has become a favorite among IoT enthusiasts. Its low cost, small form factor, and extensive community support make it an excellent choice for IoT projects. Below are some reasons why Raspberry Pi is ideal for building remote IoT VPC networks:
- Cost-Effective: Raspberry Pi devices are affordable, making them accessible for small-scale projects and experiments.
- Flexibility: With GPIO pins and support for various sensors, Raspberry Pi can interface with a wide range of IoT devices.
- Community Support: The Raspberry Pi community is vast, offering tutorials, forums, and open-source projects to help you get started.
- Compatibility: Raspberry Pi supports multiple operating systems, including Raspbian, Ubuntu, and others, giving you the flexibility to choose the best environment for your project.
Raspberry Pi Specifications
To better understand the capabilities of Raspberry Pi, here’s a table summarizing its key specifications:
| Model | Processor | RAM | Connectivity | GPIO Pins |
|---|---|---|---|---|
| Raspberry Pi 4 | Quad-core Cortex-A72 | 2GB/4GB/8GB | Wi-Fi 5, Bluetooth 5.0 | 40 |
| Raspberry Pi Zero | Single-core ARM11 | 512MB | Wi-Fi, Bluetooth | 40 |
Getting Started with AWS Free Tier
AWS Free Tier provides a range of services that are free to use for 12 months after signing up. This includes access to EC2 instances, S3 storage, and IoT Core, making it an excellent platform for building IoT solutions. Here’s how you can get started:
Read also:Kristina Sunshine Jung A Comprehensive Guide To Her Life And Career
- Create an AWS Account: Sign up for an AWS account if you don’t already have one. The free tier is available to new users.
- Explore Free Tier Services: Familiarize yourself with the services included in the free tier, such as EC2, S3, and IoT Core.
- Set Up Billing Alerts: Configure billing alerts to ensure you stay within the free tier limits and avoid unexpected charges.
Setting Up a VPC on AWS
Creating a VPC on AWS is a straightforward process. Follow these steps to set up your VPC:
- Log in to AWS Console: Navigate to the VPC dashboard and click “Create VPC.”
- Define VPC Parameters: Specify the IP address range, subnets, and route tables for your VPC.
- Enable DNS Resolution: Ensure DNS resolution is enabled to allow devices to communicate using domain names.
- Configure Security Groups: Set up security groups to control inbound and outbound traffic.
VPC Security Best Practices
Securing your VPC is critical to protecting your IoT devices and data. Here are some best practices:
- Use Security Groups: Restrict access to your VPC by defining strict security group rules.
- Enable Network ACLs: Use Network Access Control Lists (ACLs) to add an additional layer of security.
- Monitor Traffic: Use AWS CloudWatch to monitor network traffic and detect anomalies.
Connecting Raspberry Pi to AWS
Connecting your Raspberry Pi to AWS involves configuring the device to communicate with the VPC. Here’s a step-by-step guide:
- Install AWS CLI: Install the AWS Command Line Interface (CLI) on your Raspberry Pi.
- Configure AWS Credentials: Set up your AWS access key and secret key on the Raspberry Pi.
- Test Connectivity: Use the AWS CLI to test connectivity to your VPC.
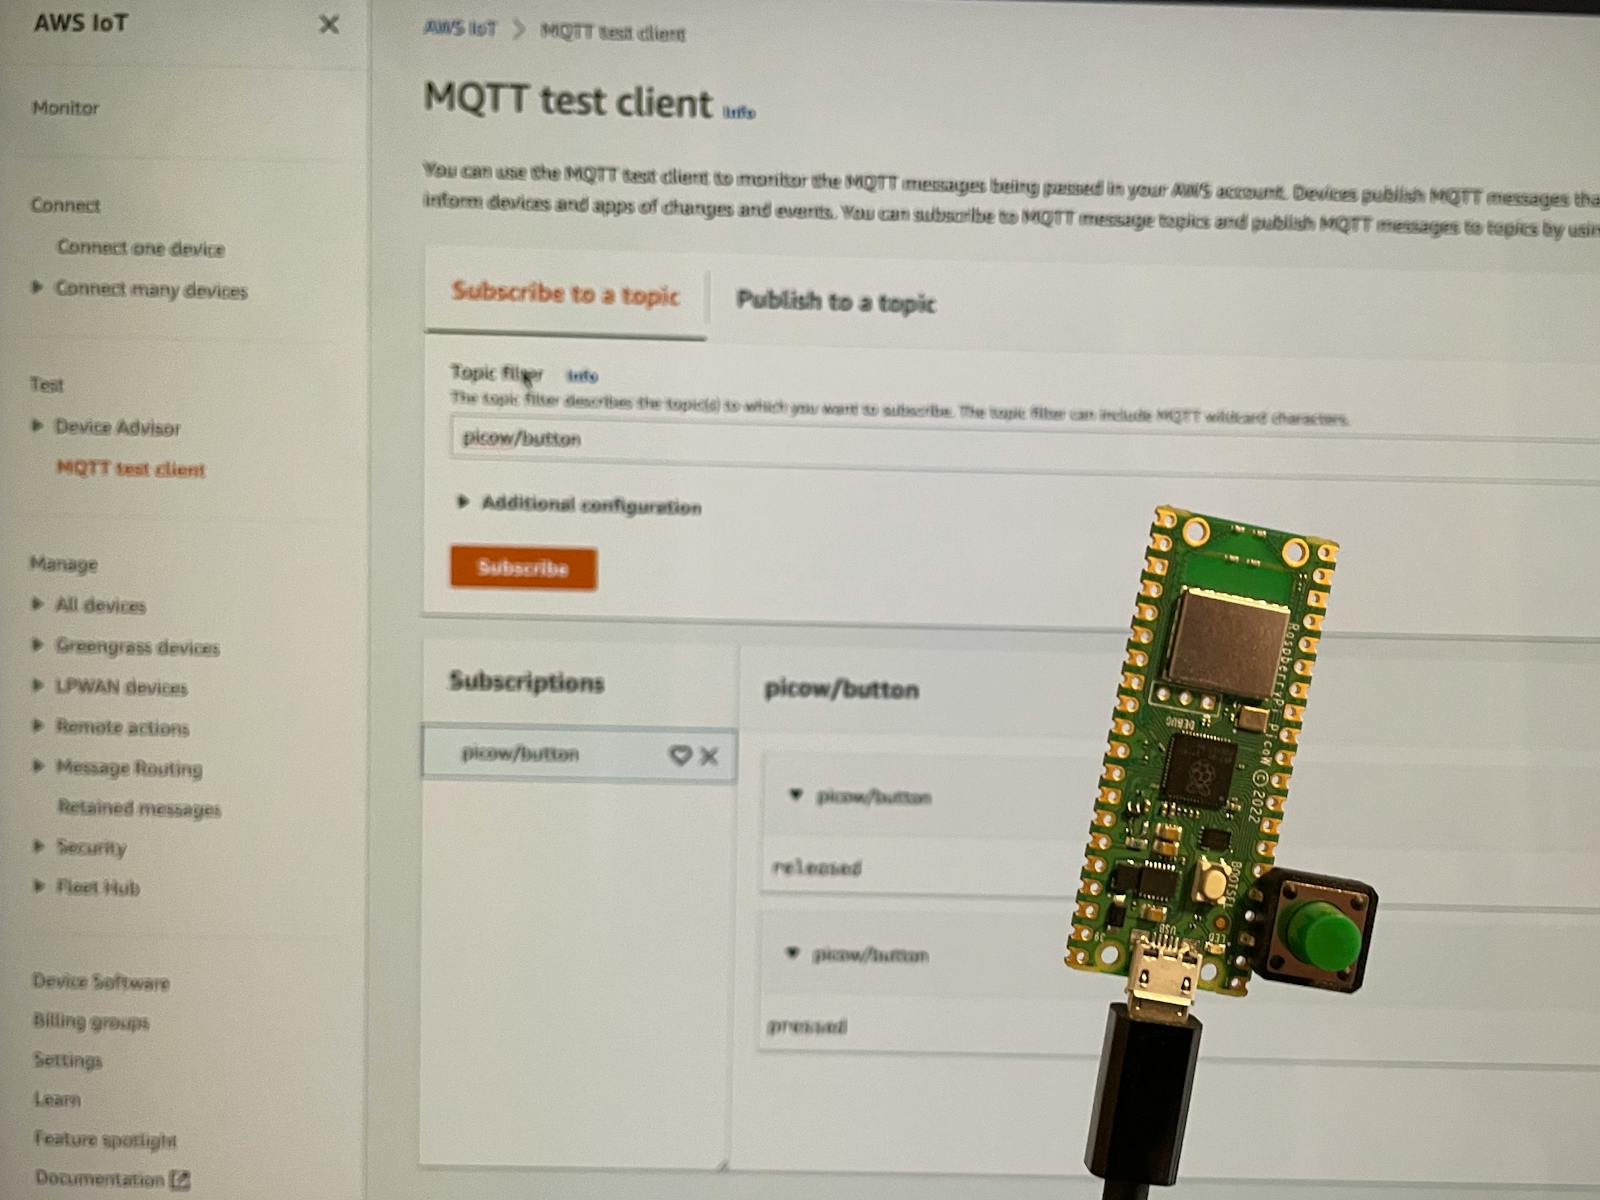
Configuring IoT Core for Remote Access
AWS IoT Core is a managed service that enables secure communication between IoT devices and the cloud. To configure IoT Core for remote access:
- Create an IoT Thing: Register your Raspberry Pi as an IoT Thing in the AWS IoT Core console.
- Generate Certificates: Create and download the necessary certificates for secure communication.
- Install SDK: Install the AWS IoT SDK on your Raspberry Pi to enable communication with IoT Core.
Securing Your IoT Network
Security is a top priority for any IoT project. Here are some tips to secure your IoT network:
- Encrypt Data: Use encryption to protect data in transit and at rest.
- Update Firmware: Regularly update the firmware on your Raspberry Pi and IoT devices.
- Use Strong Passwords: Ensure all devices and accounts have strong, unique passwords.
Scaling Your IoT VPC Network
As your IoT project grows, you may need to scale your VPC network. AWS provides tools like Auto Scaling and Elastic Load Balancing to help you manage growth efficiently.
Troubleshooting Common Issues
Here are some common issues you may encounter and how to resolve them:
- Connectivity Issues: Check your VPC configuration and security groups.
- Device Authentication Errors: Verify your certificates and credentials.
- High Latency: Optimize your network settings and use AWS Global Accelerator.
Conclusion and Next Steps
In this guide, we’ve explored how to build a remote IoT VPC network using Raspberry Pi and free AWS resources. From setting up a VPC to securing your IoT devices, we’ve covered all the essential steps to help you get started. By leveraging AWS’s free tier and the versatility of Raspberry Pi, you can create a cost-effective and scalable IoT solution.
Now that you have the knowledge and tools, it’s time to take action. Start by experimenting with the AWS free tier and Raspberry Pi to build your IoT network. Share your experiences in the comments below, and don’t hesitate to reach out if you have any questions. Happy building!