Remote IoT VPC Network Raspberry Pi AWS is a revolutionary concept that combines the power of cloud computing with the flexibility of IoT devices. Imagine controlling your IoT devices remotely, securely, and efficiently through a Virtual Private Cloud (VPC) on Amazon Web Services (AWS). This setup not only enhances security but also ensures seamless communication between your Raspberry Pi and other connected devices. Whether you're a developer, a tech enthusiast, or a business owner, understanding how to leverage AWS for remote IoT operations can significantly improve your workflow.
In today's fast-paced digital world, IoT devices are becoming increasingly important. From smart homes to industrial automation, the demand for reliable and scalable IoT solutions is growing. However, managing IoT devices can be challenging, especially when it comes to ensuring secure communication and data integrity. This is where AWS comes into play. AWS provides a robust infrastructure that allows you to create a secure VPC environment where your IoT devices can operate safely.
This article will guide you through the process of setting up a remote IoT VPC network using Raspberry Pi and AWS. We'll cover everything from the basics of IoT and VPC to advanced configurations that ensure optimal performance. By the end of this article, you'll have a clear understanding of how to integrate Raspberry Pi with AWS to create a secure and efficient IoT network.
Read also:Unraveling The Legacy Of Johnnie Cochran A Legal Icon
Table of Contents
Introduction to IoT and VPC
The Internet of Things (IoT) refers to the network of physical devices embedded with sensors, software, and connectivity, enabling them to collect and exchange data. IoT devices range from simple sensors to complex machines, all connected through the internet. This interconnectedness allows for real-time data collection and analysis, leading to improved efficiency and decision-making.
A Virtual Private Cloud (VPC) is a secure and isolated private cloud hosted within a public cloud. AWS VPC allows you to launch AWS resources in a virtual network that you define. This setup provides enhanced security and control over your cloud resources. By using VPC, you can ensure that your IoT devices communicate securely and efficiently, minimizing the risk of unauthorized access.
Combining IoT with VPC offers numerous benefits. First, it enhances security by isolating your IoT devices from the public internet. Second, it allows for better resource management and scalability. Finally, it provides a flexible environment where you can deploy and manage your IoT applications with ease.
Why Use Raspberry Pi for IoT?
Raspberry Pi is a popular choice for IoT projects due to its affordability, versatility, and ease of use. It is a small, single-board computer that can run various operating systems, including Linux. Raspberry Pi's GPIO pins allow it to interface with a wide range of sensors and actuators, making it ideal for IoT applications.
Advantages of Raspberry Pi
- Cost-Effective: Raspberry Pi is affordable, making it accessible for hobbyists and professionals alike.
- Flexibility: It supports multiple programming languages and operating systems, allowing for diverse applications.
- Community Support: Raspberry Pi has a large and active community, providing ample resources and support.
Use Cases for Raspberry Pi in IoT
- Home Automation: Control smart home devices like lights, thermostats, and security systems.
- Industrial Automation: Monitor and control industrial equipment and processes.
- Environmental Monitoring: Collect data on temperature, humidity, and air quality.
Setting Up AWS VPC
Setting up a VPC on AWS involves several steps, including defining the network architecture, configuring subnets, and setting up security groups. Here's a step-by-step guide to help you get started:
Step 1: Define Your Network Architecture
Before creating your VPC, it's essential to define your network architecture. Decide on the IP address range, subnet structure, and routing tables. This planning phase will ensure that your VPC is configured correctly and meets your specific needs.
Read also:Laurel Ventimiglia A Comprehensive Guide To The Rising Star
Step 2: Create a VPC
Log in to your AWS Management Console and navigate to the VPC dashboard. Click on "Create VPC" and enter the required details, such as the IP address range and tenancy. Once created, your VPC will be ready for further configuration.
Step 3: Configure Subnets
Subnets divide your VPC into smaller, manageable sections. Create public and private subnets to separate resources based on their accessibility. Public subnets are accessible from the internet, while private subnets are isolated and can only communicate within the VPC.
Configuring Raspberry Pi for AWS
To connect your Raspberry Pi to AWS, you need to configure it properly. This involves installing the necessary software, setting up authentication, and ensuring secure communication.
Installing Required Software
Start by installing the AWS SDK for Python (Boto3) on your Raspberry Pi. This SDK allows you to interact with AWS services programmatically. Use the following command to install Boto3:
pip install boto3Setting Up Authentication
Create an IAM user in the AWS Management Console and generate access keys. These keys will be used to authenticate your Raspberry Pi with AWS. Store the keys securely and configure them in your Raspberry Pi environment.
Ensuring Secure Communication
Use SSL/TLS protocols to encrypt data transmitted between your Raspberry Pi and AWS. This ensures that sensitive information, such as credentials and data, is protected from interception.
Connecting Raspberry Pi to AWS VPC
Connecting your Raspberry Pi to an AWS VPC requires setting up a secure tunnel and configuring routing rules. Here's how you can achieve this:
Setting Up a Secure Tunnel
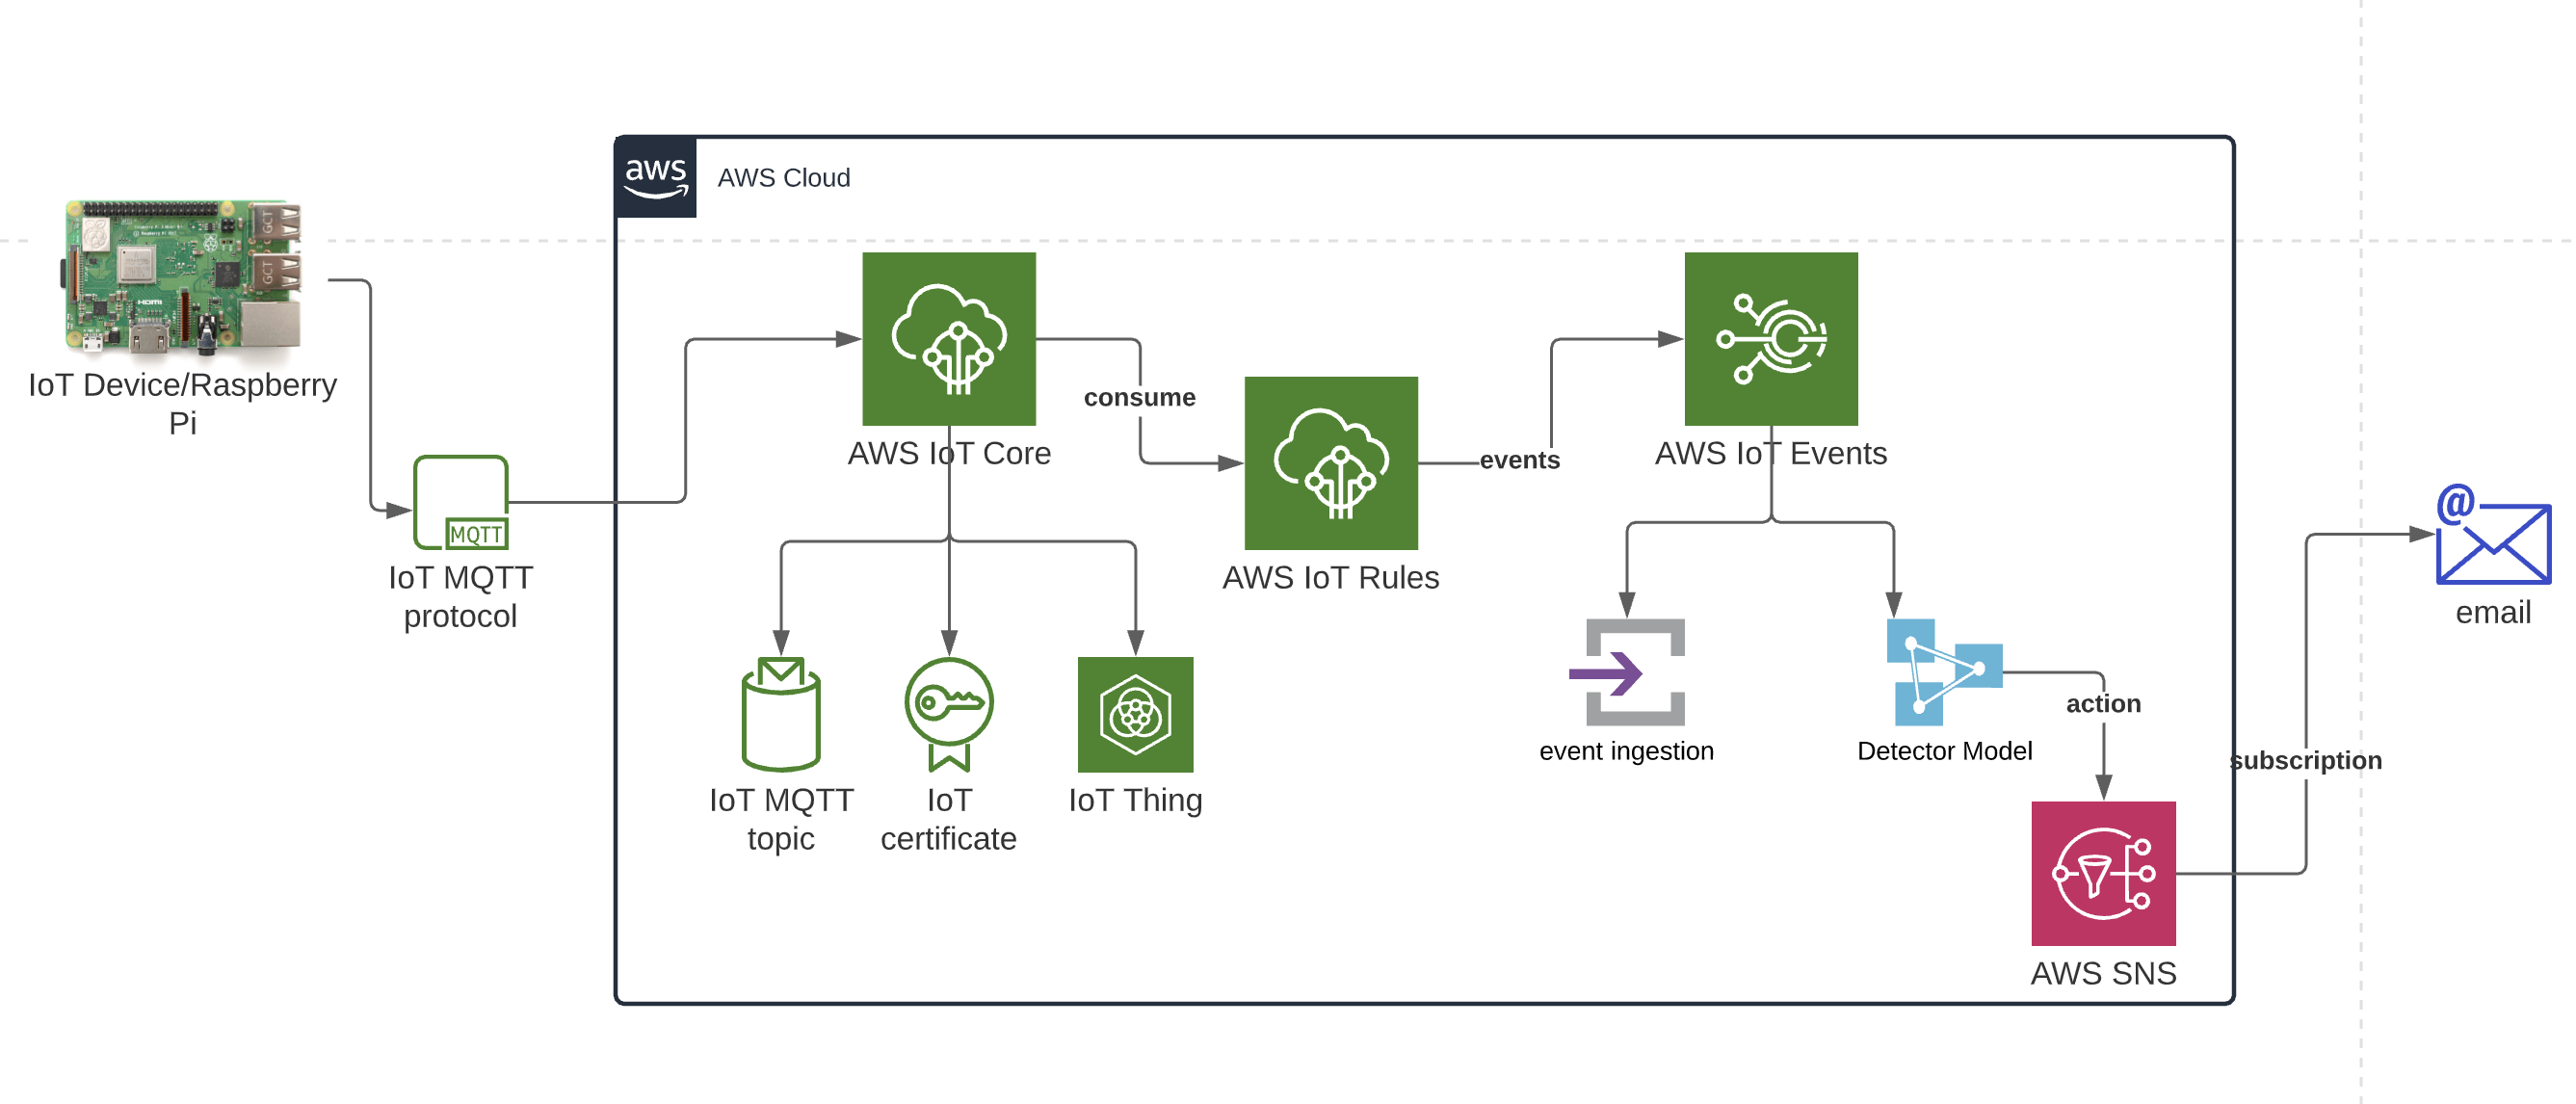
Use AWS IoT Core to create a secure tunnel between your Raspberry Pi and VPC. This tunnel allows your IoT device to communicate with AWS services securely. Follow the AWS documentation to set up the tunnel using MQTT protocols.
Configuring Routing Rules
Define routing rules in your VPC to ensure that traffic from your Raspberry Pi is directed correctly. Use route tables to specify the paths for incoming and outgoing traffic, ensuring seamless communication.
Securing Your IoT Network
Security is paramount when dealing with IoT devices. Implement the following best practices to secure your IoT network:
Implementing Firewall Rules
Use security groups and network ACLs to control inbound and outbound traffic. Define rules that allow only necessary traffic and block unauthorized access.
Regularly Updating Software
Keep your Raspberry Pi and AWS services up to date with the latest security patches. Regular updates help protect against vulnerabilities and ensure optimal performance.
Optimizing Performance
To get the most out of your IoT network, consider the following optimization strategies:
Load Balancing
Use AWS Elastic Load Balancing to distribute traffic evenly across your IoT devices. This ensures that no single device is overwhelmed, improving overall performance.
Monitoring and Logging
Implement monitoring and logging using AWS CloudWatch. Track performance metrics and logs to identify and resolve issues quickly.
Troubleshooting Common Issues
Even with careful planning, issues can arise. Here are some common problems and their solutions:
Connectivity Issues
Check your network configuration and ensure that all devices are connected correctly. Verify that security groups and routing rules are set up properly.
Authentication Errors
Double-check your IAM credentials and ensure they are correctly configured on your Raspberry Pi. Regenerate keys if necessary.
Advanced Configurations
For those looking to take their IoT network to the next level, consider the following advanced configurations:
Using AWS Lambda
AWS Lambda allows you to run code without provisioning servers. Use Lambda functions to process data from your IoT devices and trigger actions based on specific events.
Integrating with Other AWS Services
Integrate your IoT network with other AWS services like S3 for storage, DynamoDB for databases, and SageMaker for machine learning. This integration enhances functionality and provides a comprehensive solution.
Conclusion and Next Steps
In conclusion, setting up a remote IoT VPC network using Raspberry Pi and AWS offers numerous benefits, including enhanced security, scalability, and flexibility. By following the steps outlined in this article, you can create a robust IoT network that meets your specific needs.
We encourage you to experiment with different configurations and explore the full potential of AWS services. Share your experiences and insights in the comments below, and don't hesitate to reach out if you have any questions. For more information, consider reading our other articles on IoT and cloud computing.